
In photography there are always trade-offs. Modern DSLRs try to balance the trade-offs to give you the perfectly exposed photo.
When it comes to shooting mode, I’m an Aperture kinda girl. I love the control I have over the DOF (Depth of Field). WIthout thinking I can spin that adjustment dial until the image is bright enough and the subject is isolated to my satisfaction. I developed my love of the Aperture Mode over the course of years of shooting things that don’t move a lot, like flowers and rusty things. When I started shooting birds, I started in Auto to see what the camera would choose for the situation. I noted the shutter speeds seemed to be between 200-350. Moving to Aperture mode, I kept that number in mind. Since I hate noise (grainy-ness) and love bokeh (the cool blurry swirly backgrounds in photos that make the subjects pop), I kept the ISO low and the Aperture pretty close to wide open. That is my comfort zone. Unless I am shooting in a studio under a light kit I keep to that formula.
That brings us to the trade-offs. What I give up for my love of a shallow DOF and lots of creamy bokeh is the ability to stop action unless there is a ton of light. Sometimes I have gotten pretty lucky, but not nearly as often as I would like. I see in focus action shots of wildlife all the time, I see them taken with mirrorless cameras too – there has to be a way. Trying a new mode would prove to be part of the answer. It’s time to leave my comfort zone and tread out into the wilderness that is Shutter Mode! After reading some articles I have decided that since this whole bird obsession thing is an exercise aimed at becoming a better photographer, I owe it to myself to try this long neglected mode on my camera.
This weekend I was pretty much house bound with a nasty bug courtesy of a tick bite acquired on a recent hike, so I read a few articles about shooting birds. Something I had never considered was increasing the ISO – for me the low ISO has been like a treasured idol in my toolbox of predictable outcomes, even though my camera has one of the highest ratings for performing at higher ISO settings. Another thing I had to give up was the image review feature – the more I shoot the more I have seen how that third-of-a-second image in my viewfinder has robbed me of shots, losing my subject as the image flashed onscreen. By Sunday I resolved that I was ready to take off the training wheels and try this out.
I decided to start a quest to understand the structure of a hummingbird’s wings. I have shot lots of hummers in the last year and have always focused on their eyes whenever possible. I still did that, but I did a few things to increase my odds of getting a good shot. First, I made my focus point as small as possible so that I did not have to pre-focus on the feeder first and hope to get a focus on the bird. Next, I chose certain feeders to focus on – ones that were in bright sunlight. Finally, I deleted all shots of birds not in motion – I have hundreds of clean focused shots of birds sitting still – I want to see motion. I also deleted shots where the wings were not definable. I took some test shots at different shutter speeds – 500, 640, 800, and 1000 – each of these settings required a change in ISO to produce an image bright enough to use. I used to work with ISOs from 200-800 – now I would work as high as 2500. Beyond that I was just not happy with the grainy nature of the test shots in the available light on that day. This required me to change settings as the light changed – it was a partly cloudy day so I got lots of practice.
The shots that follow are not great, but I am seeing that it is possible for me to get closer to capturing or potentially stopping movement. Stopping a hummingbird’s wing is an unrealistic challenge – but I do think that I understand the structure better now.
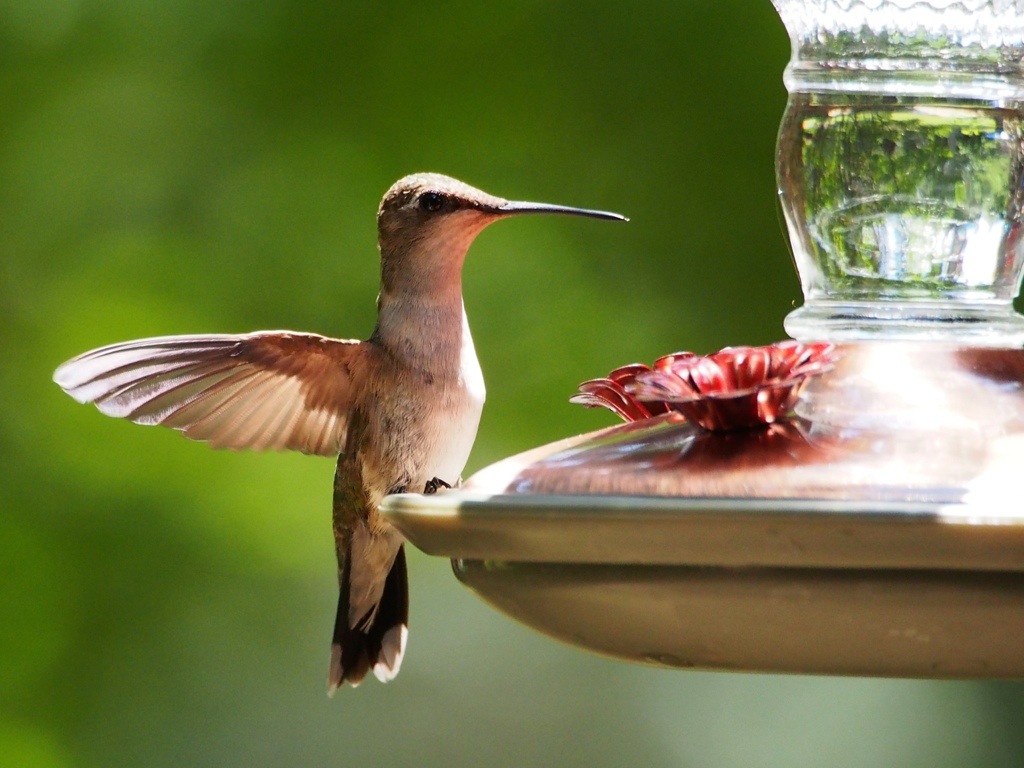
I started with some of my better shots in my old mode taken in the last week – usually in pretty good light to begin with.

f6.7 1/250 sec ISO 1000
This is one of my better efforts in Aperture Mode

f6.7 1/250 sec ISO 1600
This is a shot where I just increased the ISO – the light was almost perfect so even in Aperture Mode I got a sense of the feathers.

F5.9 1/250 sec ISO 1000
Still in Aperture Mode and bumping up the ISO first – still wonderful light
f6.7 1.250 sec ISO 250
Starting to lose the light – but because the feeder was close it still worked – I can almost make out some of the structure of the feathers – last shot in Aperture Mode.
Now onto Shutter Mode – these shots were all taken yesterday.

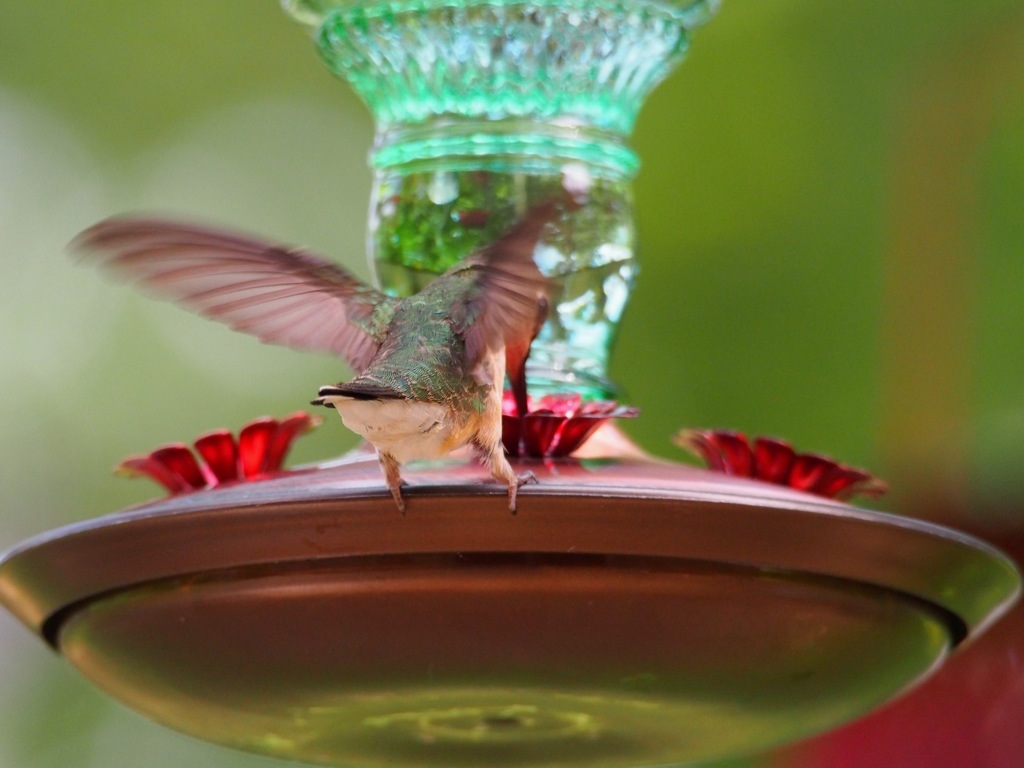
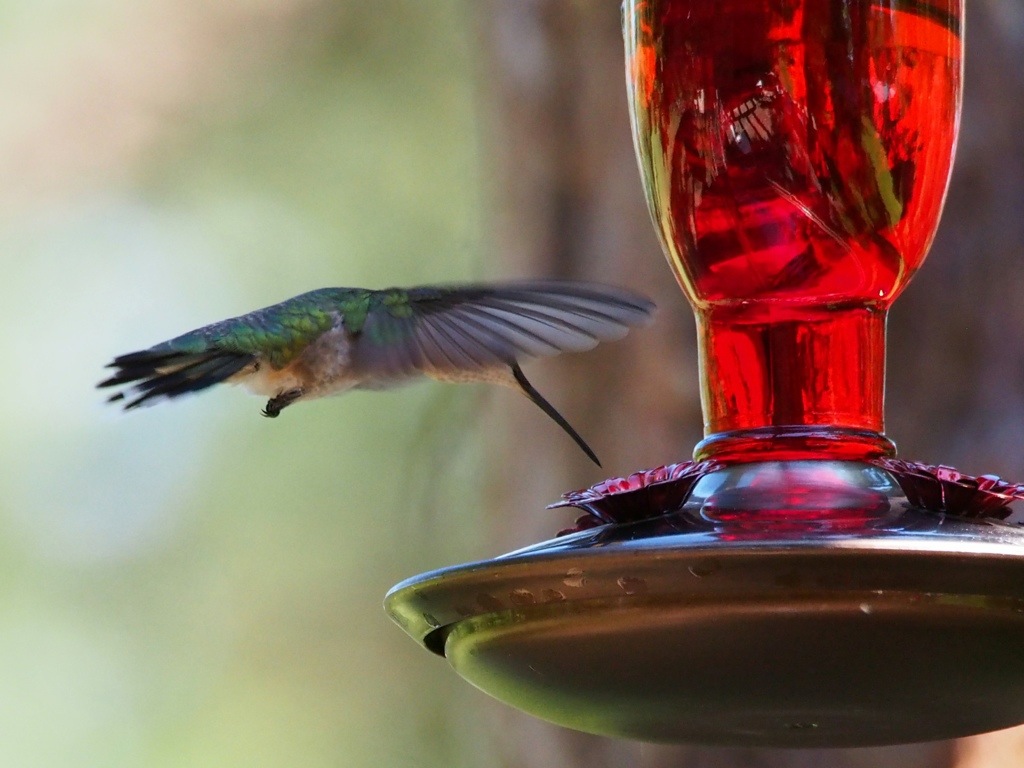
f6.1 1/250 sec ISO 1600
After a short rain shower I start a new day in Shutter Mode – kept the speed low and pushed the ISO a bit. I focused on the closer bird and can begin to see definition in her feathers.

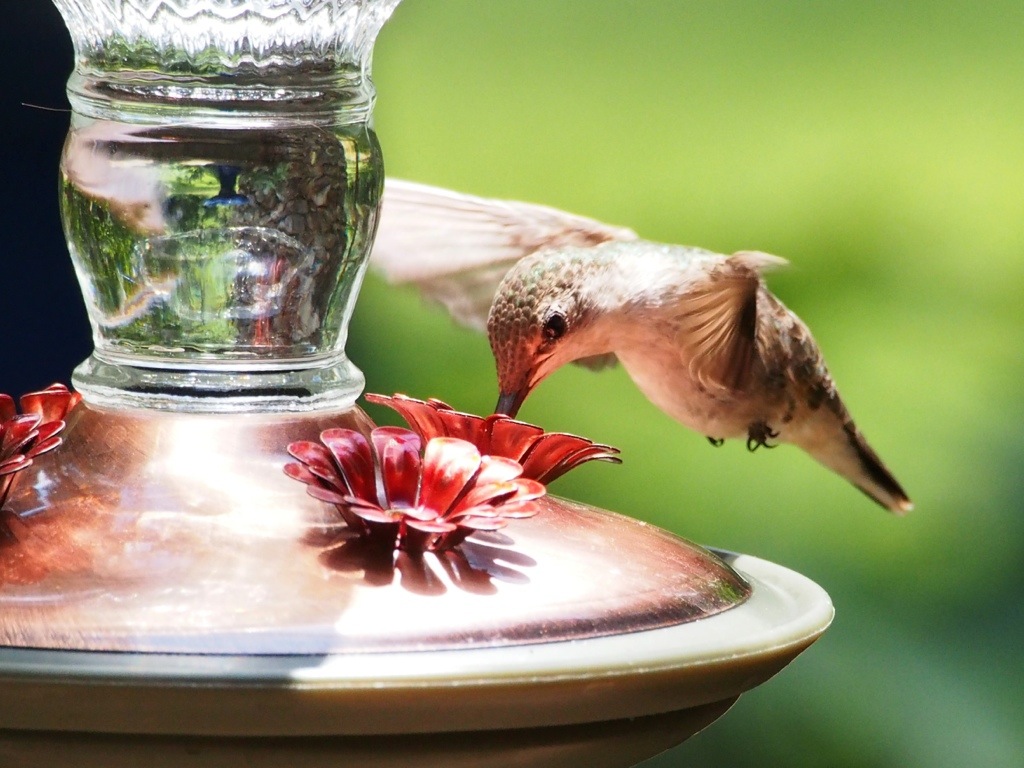
f6.1 1/250 sec 1250 ISO
The same bird moves to the other side of the feeder – you can clearly see the layers of feathers that I have previously been unable to capture. The ISO is making a difference. I only got this shot because I disabled the preview feature. With no image to review I can keep shooting.

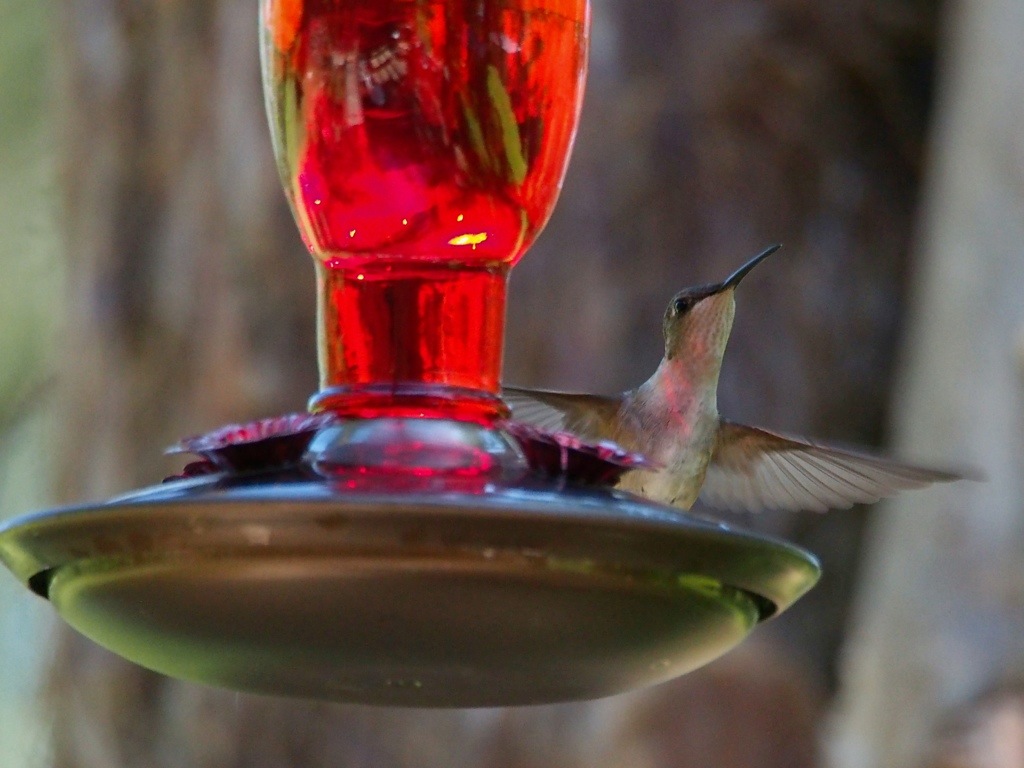
f6.7 1/640 sec ISO 2000
The bird is scratching in flight – in Aperture Mode this shot is a goner, it would have been a blurry mess. In Shutter Mode it is fairly clear and you can see the underside of his wing, plus it stopped the action of his foot.
f8 1/800 sec ISO 2000
A bit too much sunlight, but this shot captures the recoil motion of a wing flap. The smaller Aperture setting has slightly reduced DOF – just a bit deeper focus on the bird and feeder. Personally I like the inverted image of my pergola in the feeder too.
f6.7 1/800 sec ISO 2000
This is more detail than I have ever seen on a wing – the sunlight was pretty intense, blowing out a couple of areas, but the grain is OK so far.
f6.7 1/640 sec ISO 2000
It’s clouding up and I’m losing light. More grain than I like but I am still seeing feather structure – managing ISO is the crucial.
f6.7 1/640 sec ISO 2500
Same bird – another shot I would have missed if I hadn’t turned off the preview feature and an angle I rarely capture because the movement is the closest thing making focusing a crap shoot. I I’m still seeing feather structures even in this lower light.

f6.7 1/500 sec ISO 2500
The sun peaks back out and I get a shot with a bit lower speed – you can see how much feather detail is lost by moving below 1/640 second.
So to sum up – speed + ISO + good lighting = better ability to stopping action, but the trade-off can be grain in your image unless the light is really great. My camera has a huge ISO range and I just need to push it to see how far it can go on a good sunny day. This probably seems like old hat to most wildlife photogs, I was probably doing things the hard way and I clearly was not making use of my camera’s capabilities. I have been resistant to trying to shoot fast-moving things like sports events because I have limited myself by staying in that comfort zone – it’s time for me to break things loose.

Pingback: Shutter Speed – A Month of Hummers | the eff stop
Like you, I use aperture mode almost exclusively – but when speed is involved, switch to shutter. This is a great post, with explanations and great photos.
Thanks – I’m thinking a lot more about the method to my madness these days. I think using the right mode gets you more out of the amazing machine that your camera is.
Be careful, you are opening up a whole new world 🙂
It will be great news for your viewers!
😊
Pingback: Shutter Speed Part 3 – Happy Accidents | the eff stop
They say the average time viewing a blog is 30 seconds. I spent way more than that looking at these beautiful shots and reading all the information. You do a great job of explaining. My camera only goes to 1600, and I have rarely used that one except inside when there wasn’t much light, and that was a disaster. Your pictures captured the wings. Hummingbirds are so quick, I struggle to get the shutter clicked in time for them to even be in the picture. Nicely done! 🙂
Thanks, I really appreciate that. I have found that if I make my focus point as small as possible that I have a better shot at grabbing a focus on a hummer. I always aim for their eyes. Sometimes I just focus on the neck of the bottle and shift to the bird and hope for the best. I bet you could look up a review for your camera on a site like Digital Photography School and see where the experts thing the quality drops off in your ISO. I tend to keep ISO low and shoot slower in low light to avoid noise.
That explains why I usually don’t have a lot of noise. Only when I shoot inside buildings lit by artificially dim light.
Noise is really determined by the camera model. Some cameras have noise at 800 and some have very little at 4000. I typically move to a faster lens inside though, like you I prefer to keep the nose down.
Your camera is much more versatile than mine, though. My settings don’t go so high, nor do I have that much control on fast and slow lenses.
Lorri, these pictures are incredible.
I don’t know anything about photography, or didn’t. But I have a question — you don’t think I can take shots like this with my iPhone?
LOL Elyse, of course you can, you just need to pan with it – it’s all done in post anyway 🙂
You think you’re so funny …
I have a Nature Conservancy calendar that has a hummingbird phot for June. Your pictures are much better!
Seriously, I just did an art show where someone came into my display and told her friend that she had shots just like mine on her iPhone. You are too kind – but thanks.
Then her friend must have and iPhone 20!
I know – right? That’s the difficulty in selling photography as art, everyone is a photographer in the age of the smart phone.
There is a bit of a difference in quality, though!
I sure like to think so – sometimes the consumer just doesn’t get that. It’s like the old adage about modern art – it’s one thing to look at something and say you could have done that and it’s another thing to actually do it.
Pingback: Shutter Speed Part 2 – Catching the Action = More Good Shots | the eff stop
These photographs are simply amazing! I was recently holidaying in Vancouver and my ambition then was to actually capture one of these superb little birds! I returned home with a dot against a skyline. Thank you for sharing and explaining. I need to go back next year and try again maybe??
Thank you! Of course you need to go back! I managed a couple of captures in Olympic National Park on the upper peninsula of Washington last month – it was tough to get close enough. These shots were taken from 6-12 feet away, so I do have an edge on the little guys. I have scouted out a tree where they lite that I hope to get to shoot some more natural images.
Look forward to following your blog. Thank you
What a great lesson, thanks! It’s giving me ideas on how to better utilise my DSLR. Thanks so much ♡
Thank you for reading and for your kind comment – good luck with your DSLR!
Your welcome and thank you 🙂
Thank you for this post. It is so informative and inspiring.
I usually just use to auto function, but I’ll try playing around with settings as well this weekend 🙂
I love your birds, do you sell pictures?
Thanks – I actually do see prints – you can email me at artsifrtsy@yahoo.com and I can give you the details.
That’s great 🙂 I’ll email you in a bit 🙂
Great post. It was interesting to see the differences as you played around with the settings. I’ve never had the luxury of so many humming birds for practice.
It’s always nice to have really low ISO but I keep thinking 1600 or less gives me a sporting chance at a good photo which leads me to two stories. When I was in Yellowstone I met this professional wildlife photographer who told me that he never went above 300 ISO to avoid all graininess in his photos even on the 48 inch screen where he did his edits. More recently I read about a wildlife photographer who referred to photographers who wouldn’t increase their ISO as “sissies”. Opinions never cease!
You know I have a resistance to increasing ISO mostly because shooting film it was a set number, and most camera reviews seem to focus on the grain in their tests. I think I need a less cloudy day and I need to push it and see what still works. There was a time when grain was a creative option, but I prefer it when prints don’t have it. 1600 sounds like a good cap.
Love these. Have yet to see two feed at a time on my feeder. Wonderful shots~
Thanks. You know this last weekend I had as many as three fighting for feeders. I think the females are still feeding their young, they seem to outnumber the males by 2 or 3 to one.
Reblogged this on My take on Life. and commented:
Love the pictures! it’s amazing.
Wonderful shots! That is one of the great things about a DSLR these days, quick shutterspeed adjustments at your fingertip and a better tolerance when using a high ISO. I have tried other modes, but Shutter Priority is my mainstay especially when shooting birds and other moving objects. However, I did take some shots of planes during the flyover at the Coca Cola 600 last month and I had too fast of a shutter that prevented blurring of the propeller! Now the planes just look like they are flying with a dead engine…
Now that is amazing – stopping a propeller! I grew up shooting film and everything was manual, so Aperture Mode seemed like a breeze. I am really liking this though, it’s really just a reversal of what I am used to. My sister called a while back asking how to stop some action of a dirt bike event and I just had to say that I don’t shoot things moving that fast. Maybe that will change 🙂
YAY for Shutter mode! I have a hard time shooting in any other mode…..excellent captures!!
You know, before I started this blog my focus was on macro and still life. I mostly shot wildlife on vacation. Your bluejay shots were one of the things that made me go looking to figure it out. It seems so logical, an I am excited to shoot more. What speed do you use on those bluejays if you don’t mind me asking? I think if I can get closer I can keep the aperture wide open and not need to boost the ISO so much.
3200!! I think you’ve done a wonderful job 🙂 I’m so happy that the bluejays helped to inspire you…There’s just something about seeing birds in flight and seeing the details of their wings…you go girl!
Wow, so my 800 is really slow, maybe you can stop a hummingbird at that speed. ☺ Time to get brave and push it. Do you have the ISO pretty high? I know I was shooting in a lot of clouds yesterday, so I may not need to go too high.
I do have it high….2000! If you’re using a tripod you should get some awesome shots…I probably have the ISO higher than it needs to be…but I know you’ll experiment and get it just where you want it 🙂
Thanks a lot – I haven’t used a tripod, but I shoot mirrorless so lenses are much lighter – I might give that a try too 🙂
Thanks for the explanation on Aperture! I have never been able to figure it out!
It can be daunting when you are trying to get it from a camera manual. Thanks for giving it a read!
These shots are gLORRIous!
LOL – you are too clever!!
It may be old hat to some but to me it’s amazing. I know the first picture is the comfort zone way but the hummer looks like a glass figurine! In later photos it looks to me like the bird just propped and held its wings open for you. These are amazing shots, I can’t wait to see more photos. 🙂
Thanks, I think you are right, the later shots look less posed and more like frozen action.
such fun and what patience it must take!
Nah, it’s my happy place, watching birds. With hummers you hear them coming. They are wonderful to watch.
Thanks for sharing, Lorri.
I always learn a lot from you.
From what I’ve read Hummingbirds must be one of the hardest birds to photograph. Good luck with the moving wings.
I can only really capture movement by using the ‘Sports’ mode and letting the camera do all the work. My brain is just too slow to calculate the correct camera settings, but like all things, the more we practice, the better we get.
oooh I have that feature on my camera – I will try to get some action shots this summer!
Awesome! I took several test shots of the feeders empty just to get a sense of how dark an image would be first, I had a couple early shots that were too dark to use.
You know I haven’t used the modes except to shoot a panorama or a sunset. I should try the sports setting on birds. What I am noticing about Shutter Mode is that so many more of my bird shots are in focus. I caught a couple of birds hopping into the air yesterday, not completely in focus, but not a big blur. I shot 25 frames of a bluejay and 23 were in tight focus. Now birds in flight, that’s something I want to figure out.
Shots like these remind me why some day I need to graduate to a DSLR!
You know if really opens up the possibilities, but there’s a lot more to carry around 🙂
without words am in awe
Thanks so much – few words, but kind ones
Well you break out of your comfort mode and we benefit! Terrific shots. I learned some stuff too which is a benefit. Thanks Lorri! Get to feeling better, nasty tics.
Ticks suck! Thanks for giving it a read – does your camera have an A or S mode?
Umm I dunno. It’s just a digital, I wish I could afford better but I can’t.
Hey, it’s a camera and it takes pictures. It’s fine 🙂
Absolutely gorgeous. Wonderful entry!! Very helpful, informative, and what beautiful shots. Well done! Many cheers,
-Autumn Jade
Thanks so much! I found myself finding sunny spots to try out higher ISOs today. Sometimes I forget that there is no waste in shooting even if it doesn’t work.
Me too, ha ha. I am always messing about with me own camera trying to find the best effect produced in freezing moving water. Now, I would ardently like to freeze the motion of a breaching shark- so far olde ancient autty jade is never fast enough to the button for that shot, let alone in the right settings. Har har, I’ll keep at it. Looking forward to more photos as you continue with this. Cheers,
Autumn Jade
I took a quick look over at your site, I feel like a total lazy butt shooting from a chair on my porch. I have a friend who specializes in moving water, he shoots from ladders in streams and rivers – amazing stuff, but it sounds pretty chilly.
Ooo I hope you enjoyed your visit. My site is languishing at the moment, I fear, as I have been ill, but I plan to be getting more of my forest-swamp-land and macros up soon.
Not at all! Your work is very gorgeous and I am learning quite a bit from you, thank you very much! I have A LOT more to learn, being still very new to moving water, but aye, it is so fun. One day I’ll have a proper underwater housing which will give me even more control over camera settings and what I’m doing out there. For now, haha, I use a very charming and rather comical bloatie bag.
I would LOVE to shoot from ladders in streams and rivers, that sounds too groovy! I am starting to take a ladder with me to the woods for a whole new perspective, never thought to take it right into the creek with me! I often go scrambling down into the creek-beds and into the swamp-lands. It is wonderful.
Right, the babbling is ceasing here, many jubilant cheers,
Autumn Jade
Oh I really enjoy your imagery and writing style – do you follow the Arty Old Bird – she has a whimsical style that reminds me of yours a bit. If you took those from a bloatie bag I need to get one of those:)
I only started shooting birds a bit over a year ago, thinking it would push me and it really has, plus I have become certifiably obsessed with them. I am always looking for things to shoot to force me to grow. I started shooting some waterfalls this spring – and the lighting is so crucial, but I am learning new things and I guess that’s the point – I think we all learn from each other – our areas of expertise cross and we glean a bit here and there.
Cheers right back atcha
Lorri
This post makes for a good tutorial. Thanks 🙂
Thanks for giving it a read 🙂
Beautiful shots.
I realise I’m very rusty on the technical details, as its been too long. But I did buy a new camera recently, and it’s a timely reminder that I’ve been lurking in the comfort / lazy zone of auto mode, and should spread my wings and give it a go.
Thanks, I have found that on Auto my camera shoots in a pretty narrow range – so I am more limited by light conditions. I need to get to the place where I can change things up without thinking like I do in Aperture Mode.
Thanks so much for breaking down your process and including shots! Very helpful!
You’re welcome, thanks for reading and commenting!
A reblogué ceci sur invitango.
These shots are just beautiful!!!
Thank you so much!
Thanks for the tips- I still need to learn a lot!
You’re welcome and thanks for chiming in – photography is something that you never completely master, there are always new techniques.
What wonderful shots and lessons! I have to get out of my auto shell and experiment. Thanks for these, Lorri!
Thanks, I think Auto is great for learning. I sometimes switch when I am in a new lighting situation to see what the camera would choose, but leaving it behind gets you to the place where you can make a camera do what you imagine 🙂 You have a great eye – take a shot in Auto to start and then see if you can improve it in Aperture Mode.
I really am going to work on it. Thanks for the help and encouragement!
😊