There are plenty of blogs to give you the exposure triangle and cheat sheets about setting aperture and shutter speeds – that’s not me. I love to talk tech, but I find that most people get the most out of the basics. You know I am just making up these rules as I go, and they are in the order I choose. This is my blog so I guess I get to make the rules.
Here are the rules so far:
Rule #1 – You need to take that camera everywhere – you will always miss the shot when you are on an adventure and your camera is not.
Rule #2 – Understand light – light is the language of photography, you need to understand it in order to translate it into art.
Rule #3 – Keep it Steady
Today almost all systems offer Image Stabilization (IS) either in the body or in the lens. For most photography there is no reason not to utilize IS, it can make a huge difference in the sharpness of most shots. IS is not a magic bullet though – it won’t hold your camera still while you take a long exposure, or shoot a super tight macro shot. For sharpness in these situations, nothing beats a tripod.
I know – tripods are not convenient, compact, or cool – but they are indispensable. Some shots are not even possible without one. One of my favorite things to shoot is the moon. You don’t get enough stability trying to shoot the moon by leaning on a fence or car. If you want craters you need three things – a long zoom, a tripod, and a remote shutter release.
Shutterbug Notes:
A full moon is often too bright to get the best detail. Shoot the night before or the night after the full moon to get maximum detail. For even more detail shoot the phases of the moon, a half-moon on a clear night will give you tons of craters and surface detail. Go for the lowest ISO and shoot above f11. I use live view and dial in my shutter speed for maximum detail and contrast. Make sure not to over expose, because you can bring out the detail you captured in editing as long as you don’t blow out the light areas. For special moons like the Honey Moon or a Blood Moon I will shoot with the aperture wider so that I capture the color, but this costs me detail.
Scroll through each gallery to see camera settings – every shot in this post was taken in Manual Mode for better control of the exposure.
Shooting the moon is pretty straightforward and a tripod makes sense, but what about capturing movement? I know you have seen those night cityscapes with lights in motion. I like these best when some detail – architecture or foliage, for example – are perfectly sharp.
Shutterbug Notes:
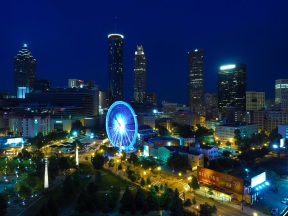
On a recent trip to Atlanta I was fortunate to stay in a hotel overlooking Centennial Park. I set up my tripod on a balcony and took aim at the ferris wheel. The faster the shutter speed the more color and detail in the surrounding light was retained in the final image. As I slowed down the shutter speed the motion became more apparent. I shot with a medium aperture – between f5 and f8 and experimented with shutter speeds varying from 1/3 second to 6 seconds. My favorite image is the last with all the fine detail of the park and a complete blur of the ferris wheel. The next time you go to a carnival or fair, take your tripod along and give this a try.
I know there are breathing and gripping techniques that let you get the most out of a handheld shot, but reasonably this is not effective beyond a about a 30th of a second. So many wonderful things are out there for you to try with longer exposures. Over the 4th of July I decided to try to capture one of those amazing fireworks shots you see in magazines. I couldn’t get a view of the big show, so I shot these down on the lakeshore.
Shutterbug Notes:
I just found a spot where I could shoot both the sky and the fireworks on the beach. I shot all three of these shots at f11. The sunset shots are 1/2 second, the sky shot is the classic 4 second fireworks shot – that long exposure lets your frame fill with explosions – but the trick is you have no idea what will enter your frame when you click the shutter. You just watch the show and make your best guess.
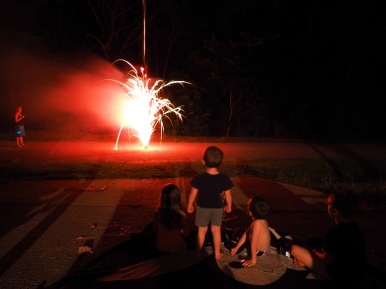
Have you ever considered shooting people with a long exposure? Well, people move a lot and that doesn’t sound like it makes sense – but what if that didn’t matter? Still thinking about the fireworks I decided to try to shoot people shooting off fireworks. This is an area where you can get really creative. I took these shots in a driveway in the dark.
Shutterbug Notes:
I decided to just try to focus on the sparklers and let the people move in and out of focus. Some of the kids were very young and their enthusiasm was palpable. It was hard for them to understand that we wanted them to hold their faces still – but I’m glad they worked out this way. The joy and movement in their faces punctuates their experience. I sat in a chair so that I saw them at eye level. I shot all of these images wide open at f2.8 for 2 seconds
One of my favorite subjects is a sunset – and I have been shooting them regularly for years. Recently I started getting out the tripod to shoot them. It slows me down and opens me up to more experimentation.
Shutterbug Notes:
Sunsets are a great subject to experiment with bracketed exposures or HDR. This is only possible on a tripod. Your camera takes multiple exposures at different shutter speeds and you later stack them and retain the both highlights, mid tones, and shadows. This is easy to overdo so it’s important to not push it so far that the image looks fake. A tripod will also let you shoot after most of the light is gone – a longer exposure can enhance the color that is there even after the sun has set.
The bottom line is that none of the shots in this post could have been successfully taken without supporting the camera. It may feel clunky at first to lug that tripod around, but the results are worth it. One thing to note, you really do get what you pay for in a tripod. The cheap one at Stuffmart will hold your camera, but it will be stiff and heavy and you won’t enjoy using as much as one with a ball head and more adjustment options. If you are watching your budget, look for an entry-level of a good brand like Manfrotto. It will be worth the extra $20-30 for the feel and stability. I recently moved to an economic carbon fiber model, the reduced weight has made me more likely to carry it.
Now – I will confess, there is one shot that was taken leaning on a fence post and not on a tripod – can you guess which one?


